














































提示词
使用 Tailwind CSS、`motion/react` 实现动画,并使用 `lucide-react` 提供图标,构建一个 React 函数组件。

**1. 字体排版与设置:**
- 从 Google Fonts 导入 "Inter" 字体(字重 400、500、600、700),并在 Tailwind 配置/CSS 中将其设为默认无衬线字体。
- 页面整体背景应为 `#f8f9fa`。

**2. 顶部留白版块(View Below):**
- 在页面顶部创建一个版块。高度在移动端/lg 应为 `50vh`,在 md 屏幕上应为 `30vh`。
- 背景颜色:`#FDFDFD`。
- 将一个显示“向下查看”的文本元素居中。文本应使用 `text-gray-300`、小字号、粗体、大写,并设置较宽的 `tracking-[0.5em]`。
- 使用 Framer Motion 为此文本添加从 `opacity: 0` 到 `opacity: 1` 的淡入动画。

**3. 主视差容器:**
- 在留白版块下方创建一个占满视口高度(`h-screen`)的主版块。
- 将其背景图设置为:`https://images.higgs.ai/?default=1&output=webp&url=https%3A%2F%2Fd8j0ntlcm91z4.cloudfront.net%2Fuser_38xzZboKViGWJOttwIXH07lWA1P%2Fhf_20260430_115327_3f256636-9e63-4885-8d0b-09317dc2b0a5.png&w=1280&q=85`
- 确保背景覆盖容器(`bg-cover bg-center`),并设置 `overflow-hidden` 和 `relative` 定位。
- 在此容器上设置 Framer Motion `useScroll` target。使用 `useTransform` 将 `scrollYProgress` 从 `[0, 1]` 映射到 `[-50, 150]`。将这个转换后的 y 值应用到前景卡车图像层(如下所述)。

**4. 顶部对齐的页脚卡片:**
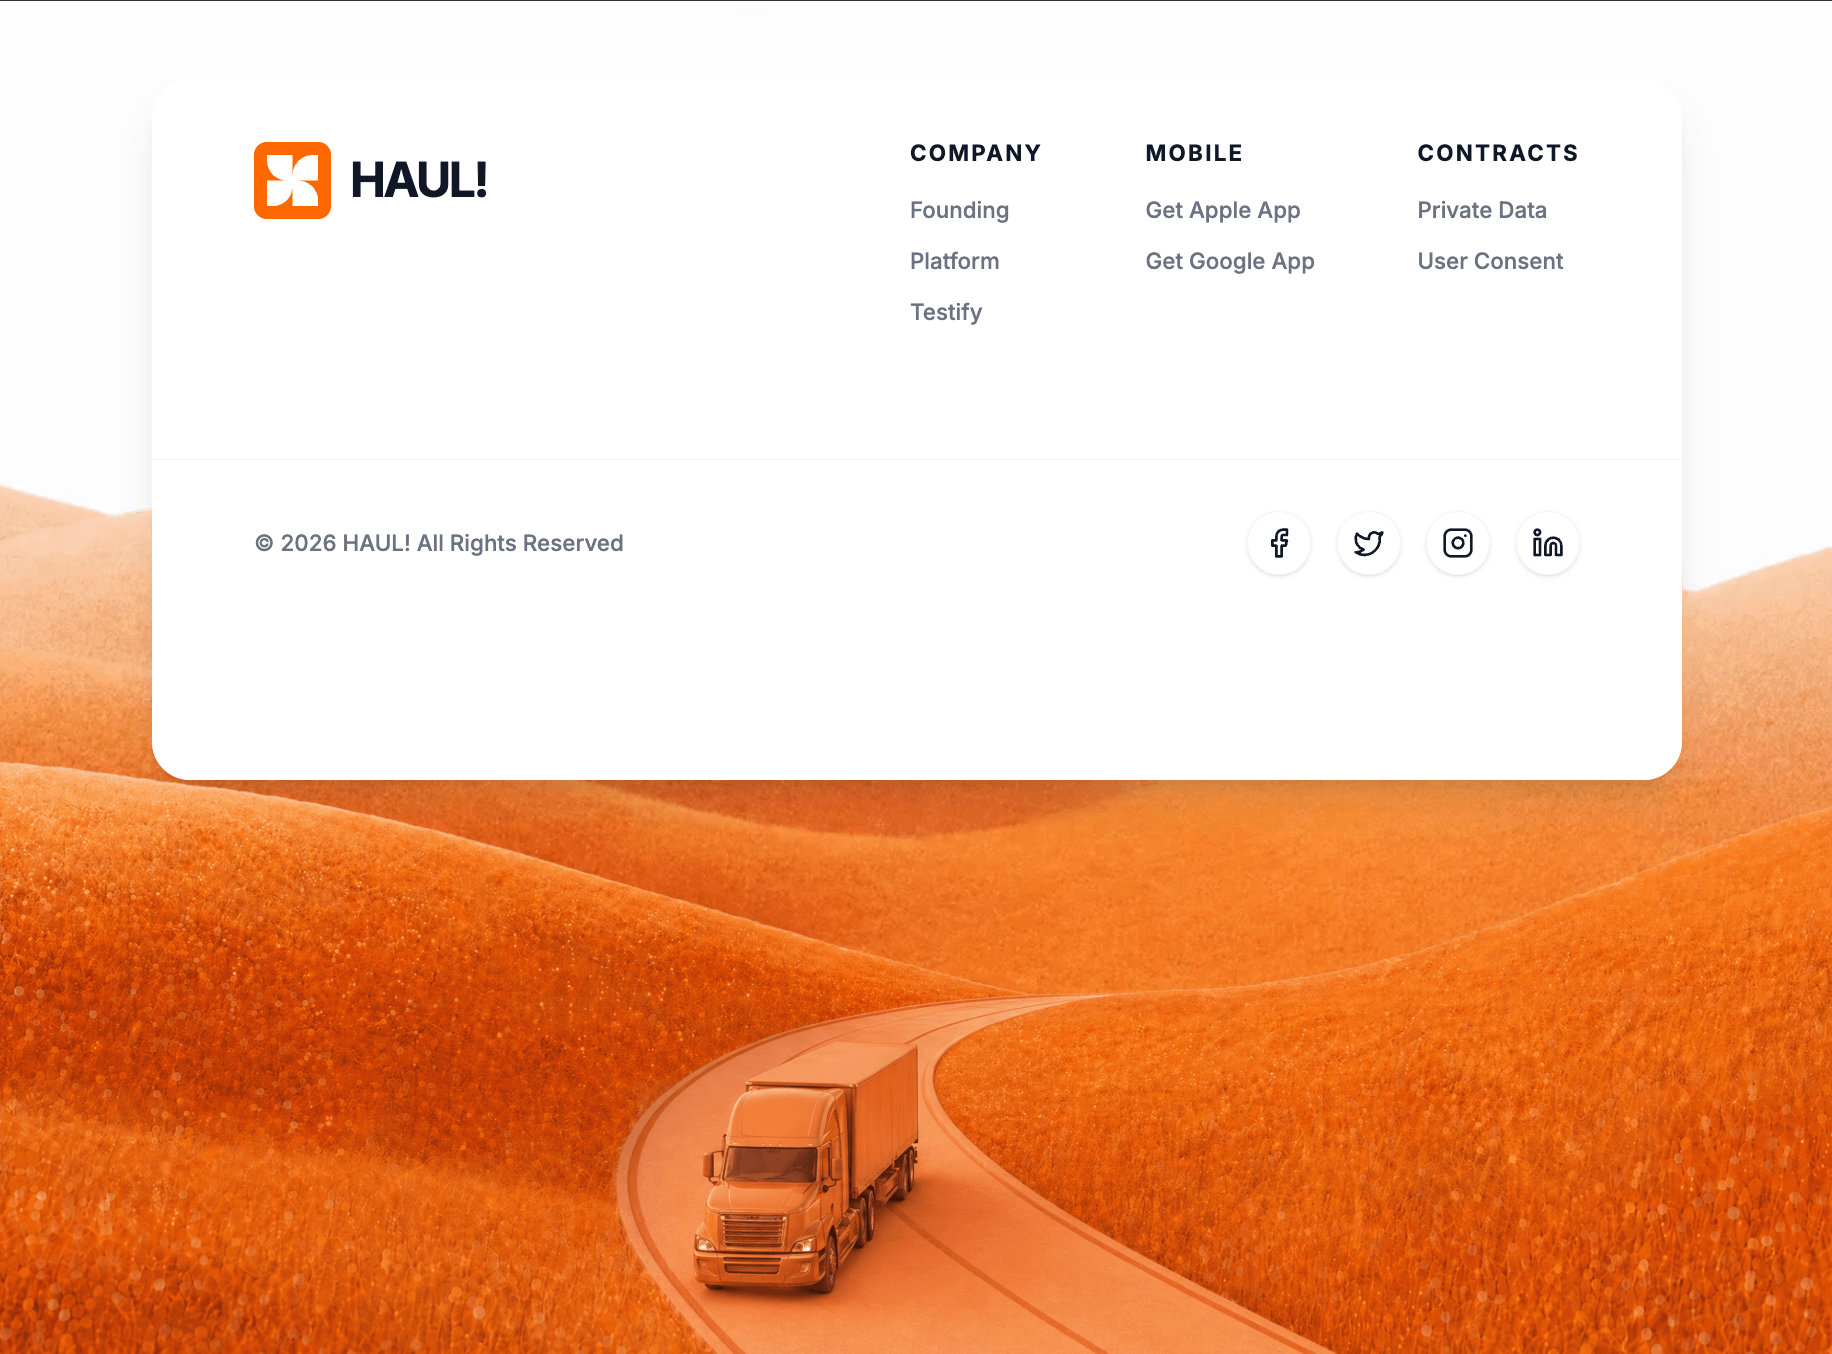
- 在主视差版块内放置一个 `absolute top-0 w-full` 容器。为其设置顶部内边距(移动端/lg 使用 `pt-12`,平板端使用 `pt-24`)。
- 在其中创建一张限制为 `max-w-7xl mx-auto` 的卡片。
- 卡片样式:`bg-white/95`、`backdrop-blur-sm`、`shadow-xl`、圆角(移动端使用 `rounded-2xl`,桌面端使用 `rounded-3xl`)、`overflow-hidden`。
- 动画:卡片应向下滑入并淡入(`initial={{ opacity: 0, y: -20 }}`、`animate={{ opacity: 1, y: 0 }}`,持续时间 0.8s,easeOut)。
- **页脚内容(上半部分):**
  - 使用 flex 行布局(移动端为 flex-col,md+ 为 flex-row),并分散对齐空间。
  - **Logo 区域**:添加一个橙色方块(`bg-orange-500`,移动端为 40x40px,桌面端为 48x48px,rounded-lg、shadow-inner、p-2)。在方块内部放置一个 viewBox 为 "0 0 256 256" 的 SVG,并使用以下完全一致的白色 path:`d="M 228 0 C 172.772 0 128 44.772 128 100 L 128 0 L 0 0 L 0 28 C 0 83.228 44.772 128 100 128 L 0 128 L 0 256 L 28 256 C 83.228 256 128 211.228 128 156 L 128 256 L 256 256 L 256 228 C 256 172.772 211.228 128 156 128 L 256 128 L 256 0 Z"`。在 logo 块旁添加文本 "HAUL!"(`text-gray-900`、2xl/3xl、font-bold、tracking-tighter)。
  - **链接区域**:使用 flex 展示 3 栏链接。布局:`Company`(创立、平台、客户评价)、`Mobile`(获取 Apple App、获取 Google App)、`Contracts`(隐私数据、用户同意)。版块标题应为大写、tracking-widest、text-sm、粗体。链接项应为 gray-500、font-medium,并在悬停时通过过渡变为 `orange-600`。
- **页脚内容(底栏):**
  - 添加顶部边框(`border-gray-100`),并使用纯白色背景(`bg-white`)。
  - 布局:flex、两端对齐,文本左对齐,社交图标右对齐。
  - 文本:“© 2026 HAUL! 保留所有权利”(text-sm、gray-500、medium)。
  - **社交图标**:遍历从 `lucide-react` 导入的图标数组:Facebook、Twitter、Instagram、Linkedin(w-5 h-5)。将它们分别包裹在尺寸为 40x40px、带有 `border-gray-100` 的圆形 `a` 标签中。悬停时,应变为 `bg-orange-500`、白色文本及 `orange-500` 边框(transition all duration-300)。

**5. 背景卡车视差层:**
- 添加一个绝对定位在容器底部的 `motion.div`(`absolute inset-x-0 bottom-0 h-full`)。
- 添加标准的 pointer-events-none 和 z-20。
- 确保 `y` 轴样式绑定到第 3 步创建的 `useTransform`,使其以不同于背景的速度滚动。
- 在其中放置一张图片,`src="https://roof-wish-40038865.figma.site/_components/v2/f31fd17907ce60745d45e83a61d44fd3810d5f25/truck_1.8c4bff83.png"`。
- 图片样式:`w-full h-full object-contain object-bottom origin-bottom`。添加响应式缩放类(移动端使用 `scale-[1.5]`、sm 使用 `scale-110`、md 使用 `scale-[2.0]`、lg 使用 `scale-105`),确保卡车在各种屏幕宽度下正确适配。
原文提示词(English)
Build a React functional component using Tailwind CSS, `motion/react` for animations, and `lucide-react` for icons.

**1. Typography & Setup:**
- Import the "Inter" font from Google Fonts (weights 400, 500, 600, 700) and set it as the default sans-serif font in the Tailwind config/CSS.
- The overall background of the page should be `#f8f9fa`.

**2. Top Spacer Section (View Below):**
- Create a section at the top of the page. Height should be `50vh` (on mobile/lg) and `30vh` (on md screens).
- Background color: `#FDFDFD`.
- Center a text element that says "View Below". The text should be `text-gray-300`, small font, bold, uppercase, with wide `tracking-[0.5em]`.
- Animate this text with Framer Motion to fade in from `opacity: 0` to `opacity: 1`.

**3. Main Parallax Container:**
- Below the spacer, create a main full-viewport-height (`h-screen`) section.
- Set its background image to: `https://images.higgs.ai/?default=1&output=webp&url=https%3A%2F%2Fd8j0ntlcm91z4.cloudfront.net%2Fuser_38xzZboKViGWJOttwIXH07lWA1P%2Fhf_20260430_115327_3f256636-9e63-4885-8d0b-09317dc2b0a5.png&w=1280&q=85`
- Make sure the background covers the container (`bg-cover bg-center`) and set `overflow-hidden` with `relative` positioning.
- Set up a Framer Motion `useScroll` target on this container. Map the `scrollYProgress` from `[0, 1]` to `[-50, 150]` using `useTransform`. Apply this transformed y-value to the foreground truck image layer (described below).

**4. The Top-Aligned Footer Card:**
- Position a container `absolute top-0 w-full` inside the main parallax section. Give it top padding (`pt-12` mobile/lg, `pt-24` tablet).
- Inside, create a card constrained to `max-w-7xl mx-auto`.
- Card Styling: `bg-white/95`, `backdrop-blur-sm`, `shadow-xl`, rounded corners (`rounded-2xl` mobile, `rounded-3xl` desktop), `overflow-hidden`.
- Animation: The card should slide down and fade in (`initial={{ opacity: 0, y: -20 }}`, `animate={{ opacity: 1, y: 0 }}`, duration 0.8s easeOut).
- **Footer Content (Top Half):**
  - Use a flex row layout (flex-col on mobile, flex-row on md+) with spread space.
  - **Logo Area**: Include an orange square (`bg-orange-500`, 40x40px mobile, 48x48px desktop, rounded-lg, shadow-inner, p-2). Inside the square, place an SVG with viewBox "0 0 256 256" and this exact white path: `d="M 228 0 C 172.772 0 128 44.772 128 100 L 128 0 L 0 0 L 0 28 C 0 83.228 44.772 128 100 128 L 0 128 L 0 256 L 28 256 C 83.228 256 128 211.228 128 156 L 128 256 L 256 256 L 256 228 C 256 172.772 211.228 128 156 128 L 256 128 L 256 0 Z"`. Next to the logo block, add the text "HAUL!" (`text-gray-900`, 2xl/3xl, font-bold, tracking-tighter).
  - **Links Area**: Display 3 columns of links using flex. Layout: `Company` (Founding, Platform, Testify), `Mobile` (Get Apple App, Get Google App), `Contracts` (Private Data, User Consent). Section headers should be uppercase, tracking-widest, text-sm, bold. Link items should be gray-500, font-medium, and hover to `orange-600` with transition.
- **Footer Content (Bottom Bar):**
  - Add a top border (`border-gray-100`) and use a solid white background (`bg-white`).
  - Layout: flex, space between, aligning text to the left and social icons to the right.
  - Text: "© 2026 HAUL! All Rights Reserved" (text-sm, gray-500, medium).
  - **Social Icons**: Map through an array of icons imported from `lucide-react`: Facebook, Twitter, Instagram, Linkedin (w-5 h-5). Wrap them in `a` tags shaped as 40x40px circles with `border-gray-100`. On hover, they should turn `bg-orange-500` with white text and an `orange-500` border (transition all duration-300).

**5. Background Truck Parallax Layer:**
- Add a `motion.div` placed absolutely at the bottom of the container (`absolute inset-x-0 bottom-0 h-full`).
- Add standard pointer-events-none and z-20.
- Ensure the `y` axis style is tied to the `useTransform` created in step 3 so it scrolls at a different speed than the background.
- Inside, place an image with `src="https://roof-wish-40038865.figma.site/_components/v2/f31fd17907ce60745d45e83a61d44fd3810d5f25/truck_1.8c4bff83.png"`.
- Image styling: `w-full h-full object-contain object-bottom origin-bottom`. Add scale responsive classes (`scale-[1.5]` mobile, `scale-110` sm, `scale-[2.0]` md, `scale-105` lg) to ensure the truck fits properly on various screen widths.